Table des matières
Patch
To access the Patch
- mouse: click [PATCH]

- keyboard: press [SHIFT][P]

Purpose of the Patch
An electronic patch (soft patch) makes it possible:
- to assign more than one dimmer to a single channel.
- this routing of the signal enables the lighting designer to apply his own numeric logic to his light plot: channel 1 will be his daylight backlight despite the fact that the instruments are plugged into circuits 6, 24 and 77. He now doesn't have to redo his cue sheet when the show moves from theatre to theatre because all the channels in his CueList will remain the same, even though the dimmer/circuit numbers controlled by that channel may be different from theatre to theatre. Once the patch is done, to light his daylight backlights he will use only channel number 1 in his CueList.
Patch is the assignment of dimmers to a channel.
- to deal with illuminating problems, which may be caused by various situations:
- the lamp of the spotlight takes time to heat and respond correctly to the electricity delivered, so its light output may cut out at 25% (typical of PAR can lamps)
- dimmers in the theatre may be old, analog ones, with tired Triacs and hysteresis that respond very differently from one to another. When set to the same intensity, their light output may be so horribly different from each other that you are obliged to set some channels at 80% while others are at 50% or 65% to obtain the same intensity of light. This will be resolved by using the curve function.
- TV are more sensitive to light variations in the range of 50-70%. You will want to use a different curve to compensate for this (TV curve is known as “Square”).
- certain dimmers don't have curves built-in.
- when trying to compensate (be very careful) certain hardware is problematic:
- PARCANS in 110v without a physical serial shunt, you will need to set the curve limit to 50% to avoid the lamp exploding on 220v (note that this is not recommended and pay attention to anyone who may be around because the glass can explode!)
- a video shutter in dmx, fixed inverted, where you need to give 0 for 100% and 100% to open it.
- to make a dimmer behave like a switch, as for a sodium lighting (ON/OFF, no dimming ).
That's the purpose of curves .
How to read the patch presentation
From Top to Bottom:
- first is the Dimmer number
- second is the channel controlling the dimmer
- last is the curve number assigned to the dimmer

Feedback string
In the feedback area you can see:
- last ch selected: last channel selected will be the one to which a dimmer will be assigned.
- Dimmer's feedback string is shown while you are typing your commands, with selection, and assignments, under last ch. Here Dimmer 12 and 56 have been assigned to channel 45.

Assigning one or more dimmers to a channel
Dimmer selection
Dimmer selection is just the same as channel selection
- mouse:
- By selecting or unselecting the dimmer with a mouse click and by navigating with the vertical scroll bar to all 512 dimmers.
- By selecting functions in patch window :
- [unselect] to unselect all selected dimmers
- [all] to select all dimmers (from 1 to 512)
- keyboard, simple:
- Ex: Dimmer 5 in channel 3: [3][+] [5][SHIFT][ENTER]
- The level attribution key becames with SHIFT a dimmer assignment key.
- keyboard: using exactly the same syntax as channel selection, but pressing the [SHIFT] key with the shortcut cammands
- examples:
- Selecting dimmers 4 and 6: [4] ([SHIFT][+]) [6] ([SHIFT][+])
- Selecting All Dimmers ([SHIFT][Y])
- Unselect all dimmers ([SHIFT][ESC])
- Selecting dimmers from 12 to 18: [12]([SHIFT][+])[18]([SHIFT][TAB])
- Unselect a dimmer by ([SHIFT][-]).
Assigning a dimmer to a channel
- mouse:
- click the desired channel in Channel space
- the last channel selected is the one that will be assigned
- click [AFFECT]
- click the dimmer to assign to that channel
- if you want to add another dimmer to be assigned to this channel, leave this channel selected and click [AFFECT] and click another dimmer
- keyboard:
- sélect the desired channel in Channel space
- select the dimmer (s)
- press [SHIFT][ENTER].
If you have a complete and complex series of patches to do, use a hard-copy patch sheet. It will be easy to enter it like this:
- select dimmers: [3][SHIFT][+][4][SHIFT][+]
- select channel and affect: [25][+][SHIFT][ENTER]

Unassigning
To unpatch the dimmer and prevent it from being controlled by a channel, assign it to channel 0.
- mouse:
- click the dimmer
- click [CLEAR]
- keyboard:
- select dimmers
- press ([SHIFT][o])
Straight patching (default patching)
Straight patching: dimmers numbers are assigned to the same channel number (1/1, 2/2, 55/55 and so forth)
- mouse:
- click dimmers
- click [DEFAULT]
- keyboard:
- select dimmers
- press ([SHIFT][I])
! If you want to reset everything to your default patch: ([SHIFT][Y])([SHIFT][I])
! If you want to completely clear your patch before repatching to a new show: ([SHIFT][Y])([SHIFT][o])
Check Channel Function
Keys [LEFT] and [RIGHT] enable you to select the previous channel and the next channel.
[CTRL][LEFT] and [CTRL][RIGHT] set the previous or next channel at Full.
BUT if the Patch window is open, it will be dimmers that will be selected by [LEFT] and [RIGHT], not channels.
Assigning a Curve
A Curve modifies the signal from within the software. The initial level is changed by another level. It enables you to design a curve that alters the behavior of the dimmers to suit your needs.
You access the Curves menu by clicking [Curve] By default, this option is ON, its state is recorded on closing White Cat.
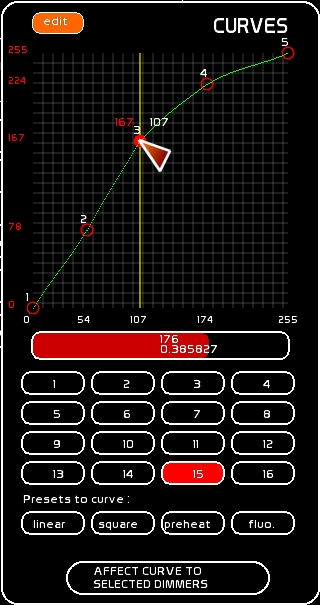
Working with curves and editing them
The signal is represented like this:
- in white the signal from channel's intensity
- in red its modified dmx output
There are 5 control points you can move on the grid.
Curve jointing points may be modified by bezier shaping with a bezier factor, which affects the whole curve (red slider down the curve).
There are 16 possible curves enabled in White Cat. Curve 1 is the default curve for all dimmers. Edit it only if you are in a desperate situation. Usually custom curves will be created on other curves.
Creating a custom curve
- Select one of the 16 curves by clicking it
- Go into the edit mode by clicking on [EDIT]
- Edit the selected curve by clicking over one of the 5 control points, on the vertical axis passing thru this point.
Notice that first point and last point (respectively 0% and 100%) can't be edited horizontally.
Assigning a curve to a dimmer
- Select the curve. This is the active curve you can assign to a dimmer or dimmers.
- Select the dimmers to assign to
- Click [Affect to dimmer].
Reloading a curve-preset inside a curve
When you need to clear a curve, you can load one of the preset curves inside of it.
- Be sure that Edit is enabled by clicking [EDIT]
- Select by clicking on one of the following presets:
- [linear] for default linear curve
- [square] for TV curve
- [preheat] for PARCANs preheat usage
- [fluo] for a dimmable fluorescent usage
- Click the preset that you want to assign the curve to.
- Now the curve has been redone and you can modify it any way you want.
Clear all the curve assignments without changing your patch assignments
- Select [linear]
- Click the curve 1 if you have not modified it
- Select all dimmers by pressing ([SHIFT][Y])
- Click [Affect to dimmer].
- Then clear your selection by ([SHIFT][ESC])
Testing your curve and fine tuning it
To quickly test: You need to load the channel to which the dimmer is assigned, to a Master.
- Select the channel and set at FULL
- click [STORE] press [F1]
- click the dock of the desired master
- now move the Master to the intensity you want, by mouse, by Midi, or with the Up and Down keys to check the reaction in a pseudo cross-fade.
- edit your curve to obtain the desired result
- try to get a direct look at the lamp, especially to calibrate the beginning of 0%
Go to Fader space to change your selection inside a master and information on how to use the docks.
CHECKS
Check your dimmers
You need to click the [Check Dimmers] button to turn it ON
- Select a dimmer with the mouse
- Use [SHIFT][LEFT] or [SHIFT][RIGHT] to navigate thru the dimmers and set them directly at a certain level, while by-passing the patch.
By default the Check dimmer level is at 75% to save on 2kw and 5Kw lamps. This level is user definable in the general configuration.
You will not see any levels on your screen as the signal bypasses the patch and overrides the dmx buffer to send directly to the dmx interface.

Check channels
To check channels and see if they are correctly patched, click the first channel to check in Channel space.
Then with the arrow keys, do [CTRL][LEFT] or [CTRL][RIGHT] to bring up one channel after another.
The 100% level in the Check Channel procedure is user definable by editing in general configuration ). This procedure is very useful for making a quick check before the house opens to the audience.